
Decisions, decisions. Blog design is full of decisions. When you think about all the possibilities out there, it’s easy to overwhelm yourself with all the directions you could take. Ack!
Earlier posts give you a good grasp on some core design principles, helping you identify your audience (or who you want it to be) and establishing some concrete goals for your blog. With that knowledge tucked into your back pocket, it’s time to take a deep breath and start narrowing down your focus.
Although you still have many more decisions to make, this chapter gets you actively gathering design ideas that will form the foundation for your overall design. For this post, roll up your sleeves to put together a mood board and study other blog designs. Here, you can also read how to make navigation design decisions based on your own analytics. Finally, I guide you through one of the biggest decisions of all: whether to design your blog yourself, purchase a design template, or hire someone to design your blog for you.
A mood board conveys a design idea by mixing textures, words, images, colors, and more. You may think that making mood boards sounds like a waste of time — but don’t underestimate them without giving it a shot. As a blogger, mood boards kick-start the creative process for designing your blog.
Regardless of who ends up actually developing the design, mood boards save time in the long run because through this exploration process, you can take those fuzzy ideas and begin creating a clearer vision of what you want to your blog design to be.
.
Even if it takes you a while to create a mood board, consider it time well spent because you gain a better a sense of the look and feel you want to achieve in your blog design. And if you’re turning over your design to a designer, a mood board can give the designer a better idea of the blog you envision.
 Start with a large surface on which to place your ideas (say, poster board, corkboard, or even some wall space), some pens and colored markers, paper, scissors, and tacks or glue. Find a space in your home where you can spread out and get to work.

When you’re ready to start compiling your inspiration into a mood board, take screenshots from your notes then lay them out in a collage using a program like PicMonkey or Photoshop.Or just keep your ideas in Evernote. Whatever works for you.
Surveying the blogging landscape also helps you spot trends in blog design or discover new plug-ins or widgets you may want to use. This section walks you through what to look for when it comes to another blog’s design and navigation. I also challenge you to look at blogs focused on topics completely different from yours. Doing so can give you a fresh design perspective.
Imitation isn’t the same as inspiration. If someone would look at your design and think (or say), “That looks just like so-and-so’s blog!”, then someone might say you copied a design. The more blogs that inspire you, the less your blog will look like someone else’s.

After you’re able to dig in and see what content is the most and least popular, you might find that you can do the following in your blog design:

Luckily, there’s more than one way to design your blog. In this section, I cover benefits and challenges for each option so you can make a choice that suits your needs.
 If you have a passion for learning
new things and don’t mind experimenting,
try designing your blog
yourself.
Of course, your reasoning
could
be less adventurous — say,
you
might just not have the funds
right
now to pay someone else to
design
your blog. Regardless the
reason,
designing your own blog can
be
rewarding!
If you have a passion for learning
new things and don’t mind experimenting,
try designing your blog
yourself.
Of course, your reasoning
could
be less adventurous — say,
you
might just not have the funds
right
now to pay someone else to
design
your blog. Regardless the
reason,
designing your own blog can
be
rewarding!
When you get stuck, my best tip is to research your way to the answer. You’re definitely not the only one who’s ever designed their own blog. The Internet is full of tutorials, forums, and videos that can teach you how to do something. Between this book and the Internet, you could teach yourself many, many things about design. Bloggers who design their own blogs themselves typically work on blog frameworks like Genesis or add customization to predesigned templates that offer a lot of flexibility.
Earlier posts give you a good grasp on some core design principles, helping you identify your audience (or who you want it to be) and establishing some concrete goals for your blog. With that knowledge tucked into your back pocket, it’s time to take a deep breath and start narrowing down your focus.
Although you still have many more decisions to make, this chapter gets you actively gathering design ideas that will form the foundation for your overall design. For this post, roll up your sleeves to put together a mood board and study other blog designs. Here, you can also read how to make navigation design decisions based on your own analytics. Finally, I guide you through one of the biggest decisions of all: whether to design your blog yourself, purchase a design template, or hire someone to design your blog for you.
Create a Mood Board - And Why
Back in your school days, do you remember grabbing a giant white poster board and pasting it full of cutouts from magazines and newspapers? That collage you made was essentially a mood board.
Techniques for creating a collage of ideas have evolved (although I show you how to make one by hand, too), the purpose of creating a mood board remains the same: From fashion design to interior design to corporate design creation, people use mood boards as a way to explore creative inspiration and spark creative ideas.
Regardless of who ends up actually developing the design, mood boards save time in the long run because through this exploration process, you can take those fuzzy ideas and begin creating a clearer vision of what you want to your blog design to be.
.
Even if it takes you a while to create a mood board, consider it time well spent because you gain a better a sense of the look and feel you want to achieve in your blog design. And if you’re turning over your design to a designer, a mood board can give the designer a better idea of the blog you envision.
Compiling ideas by hand
Creating a mood board by hand might be a little old-fashioned, but you’ll find that doing something tactile can really spark ideas for your blog design. Plus, you can add certain elements to a mood board that you can’t do with digital versions (unless you have certain tools like a scanner or pen tablet).
Start with a large surface on which to place your ideas (say, poster board, corkboard, or even some wall space), some pens and colored markers, paper, scissors, and tacks or glue. Find a space in your home where you can spread out and get to work.
Here are a few things you can add to a mood board created by hand:
- Pictures: Images from magazinesor newspapers, personal photographs, printed screenshots
- Words: Words, samples of fonts, phrases, or quotes
- Color: Paint swatches, paper, paint, markers
- Ephemera: Trinkets, memorabilia, or other things that relate to your blog topic (like your first opera ticket that turned you into an opera fanatic)
- Doodles: Your own drawings or drawings from others
For the mood board you see in image, I compiled font ideas, quotes, images, and other elements that fit my style.
Brainstorming on Pinterest
Pinterest, one of the world’s most popular social media platform, works like an online pin board. You create boards around a specific topic and then add pins from your own image library or other things you want to bookmark from around the web. Pinterest is all about visual appeal.
As a tool for creating mood boards, Pinterest gives you an easy way to showcase your ideas and things that inspire you. In image below, you can see how a mood board can translate into design. Laura Mayes from Blog con Queso shared her Pinterest board with her designer, who then created a eye-catching design to reflect her love of color.
Pinterest has some advantages that make creating a mood board extra easy:
- Secret Boards: If you don’t want your mood board to be seen by everyone, use Secret Boards, which stay private until you delete them or make them public. Visit your profile and scroll to the bottom of the page to click Create a Secret Board. You can also go on a pinning spree without overloading your followers’ feeds with 20 pictures of fonts you like.
- Multiple boards: If you aren’t sure of the design style you want for your blog, make multiple boards, each with its own unique look and feel. You can play around with different styles without lumping them into one board.
- Contributor boards: With Pinterest, you can invite other pinners to pin to your board. This comes in handy if your blog has multiple contributors who may want to contribute ideas to the blog design. You can even ask your pinning-obsessed friends to contribute to your board if they come across anything that really fits your style or personality.
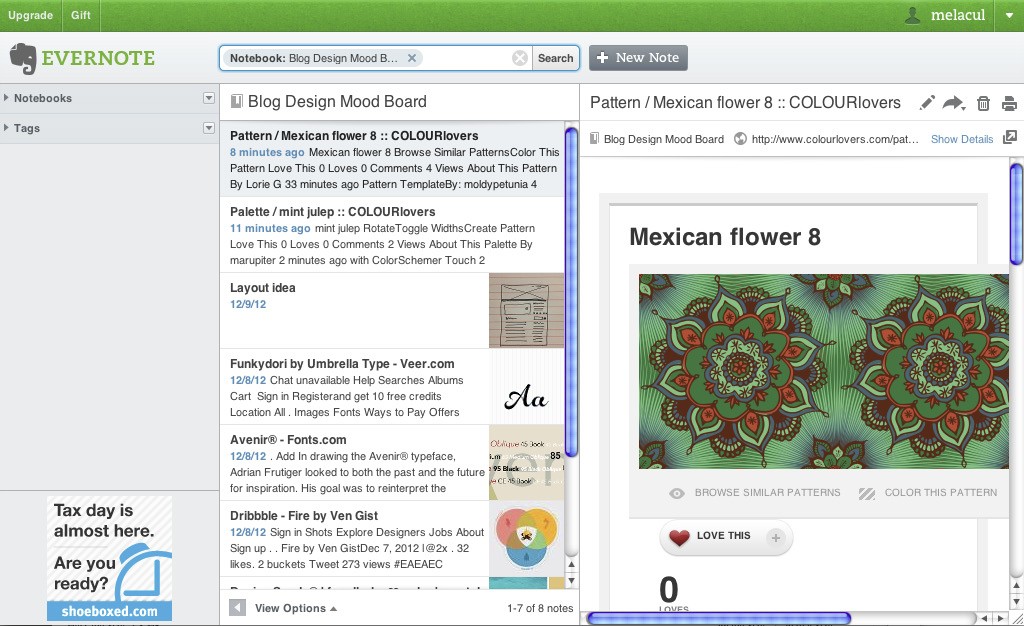
Keeping track of ideas with Evernote
If a handmade board or one on Pinterest doesn’t seem appealing, try Evernote to collect items for a blog design mood board. Evernote is a program that makes it easy for you to store articles, images, and even your own audio recordings in one place. Evernote also has a robust app for smart phones and tablets that syncs with the desktop application.
You can use Evernote as a place to contain and organize anything related to your mood board. In Evernote, you organize Notes into Notebooks. Notes can be a saved article, a photo, an audio clip, or text that’s typed directly into Evernote. I sometimes jot down ideas in a physical notebook and then take a picture from my Evernote phone app so I don’t misplace them. Similar to a mood board done by hand, you could also doodle or sketch an idea and then photograph it for Evernote. The app even turns your handwriting and text
from images into searchable content. In image below you can see a mood board Notebook.
When you’re ready to start compiling your inspiration into a mood board, take screenshots from your notes then lay them out in a collage using a program like PicMonkey or Photoshop.Or just keep your ideas in Evernote. Whatever works for you.
Studying Other Blogs
When you look at other blogs with an eye for design and navigation, you might be surprised by all the inspiration you gain. A single design element on someone’s blog could give you an idea for a blog header. Or someone’s main blog color may be the perfect shade to sprinkle through your design in much smaller doses.Surveying the blogging landscape also helps you spot trends in blog design or discover new plug-ins or widgets you may want to use. This section walks you through what to look for when it comes to another blog’s design and navigation. I also challenge you to look at blogs focused on topics completely different from yours. Doing so can give you a fresh design perspective.
Imitation isn’t the same as inspiration. If someone would look at your design and think (or say), “That looks just like so-and-so’s blog!”, then someone might say you copied a design. The more blogs that inspire you, the less your blog will look like someone else’s.
Know what to look for
Surfing from blog to blog, looking at nice designs, is fun, but keep your jaunts productive, too. Keep a short list of things to look for on another person’s blog. Then take notes about anything you like about someone’s blog design. You can also keep track of things that inspire you by using some mood board ideas, as I describe in the previous section.
To kick-start your list, here are some things you can look at:
- Overall branding: Look at how the blog name, tagline, blog colors, fonts, and other design elements tie in to one another. How many fonts and colors are used? How did the blogger or designer create hierarchy with them?
- General layout: Are two columns or three used? Note any special galleries or rotating banners and the number of blog posts featured on the home page.
- Sidebars: See what key content is placed on the sidebar. Can you easily discern a hierarchy that signals to you what is most important?
- Advertising: Is the advertising overbearing to you as a blog visitor? Is advertising shown in unusual places? How many potential advertisers are allowed? Is there a special blog page created just for advertisers?
- Navigation: How is top content displayed? What about a search box? Where are categories listed?
- Interaction: Do readers leave lots of comments and share their posts on social media platforms? If so, look at how the blog’s commenting system and social sharing buttons function.
- Footer: If the blog has a footer, what things are included? How does the footer design fit into the rest of the blog design?
Looking outside your niche
By looking within just your own niche, you may inadvertently box yourself into a certain way of thinking. You might find yourself including something in your design because everyone else does, when it might not be the right choice for your blog. Looking outside your niche can help you bring a fresh approach to your own niche.
Look at blogs outside your niche and even corporate websites or company blogs.
However, in addition to looking at things that all blogs have (blog colors, a navigation menu, and so on), consider how you can apply part of a blog’s design or navigation to your own blog. For example, if you write about travel, perhaps you notice how food bloggers often take close-up shots of their food. Maybe you get the idea to incorporate a close-up travel shot into your blog header versus a typical scenic landscape. Check out the many possibilities to take a fresh twist on your blog design!
Dig into Blog Analytics to Improve Navigation Design
Making your blog design easy to navigate means that visitors are more likely to return. Even if they never subscribe to your blog or follow you on a social network, effective navigation design means your visitors can find the content they need or explore your blog more easily.
In this section, I assume that you’re using Google Analytics to track your blog’s statistics. Of course, you might be using another program like Clicky or Statcounter, and that’s okay, too. You should be able to find similar data within these analytics programs even if the presentation of the data might vary.
Although you can surely go deeper into analytics, these next few sections give you a good grasp of how visitors use your site and what you can learn from that data.
Uncover navigation issues by looking at bounce rate
A bounce rate is the percentage of visitors who leave your blog without visiting more than one page. If I land on your home page, read awhile, and then leave your blog, that counts as a bounce. If I follow a direct link to an older posts or a page of yours and then leave, that’s a bounce, too. Any bounce rate less than 60% is typically considered decent — and rate less than 40% is pretty darn good.
This is why you want to track bounce rate: When you have a lower bounce rate, not only are you getting visitors to stay on your blog longer, but you’re also helping them easily get the information they’re looking for by guiding them with good navigation design.
To find the bounce rate for individual posts and pages, take the following steps.
- Visit your Google Analytics dashboard and log in.
If you have more than one blog, select the blog you want to look at. - From the left-side menu, choose Content➪Site Content➪All Pages.
This brings up data on all individual blog posts and pages, sorted by page views. - Click the Performance button.
Look for the third button on the far right; it looks like three stacked bars. By choosing to view the data using Performance, you can pull up two sets of data to compare. - Choose Bounces from the right drop-down menu.
Because the left column already reads Pageviews, you can now see the bounce rate of your posts and pages with the highest number of page views.

On your blog’s home page (shown by a forward slash, /), a high bounce rate isn’t necessarily a bad thing. If your blog layout has more than one full article on your page, visitors might read more than one post. They could even share your article via social media without affecting your bounce rate one way or the other. However, if your blog’s home page design shows only partial blog posts with links to Read more, a high bounce rate could signify trouble.
Here are some reasons that prevent visitors from navigating to other parts of your blog:
- Wrong keyword or phrase: People find your blog post or page with keywords that aren’t actually relevant to that page’s content.
- Outdated information: Your blog post may contain content that needs to be updated. You could reference a product that’s no longer available, your tutorial could refer to an old version of a product, and so on.
- Visual appeal: Does this blog post have an image? Is there enough contrast between your text and your background? Are your fonts hard to read?
Any of these reasons could make a visitor click the Back button and leave your site. - Nowhere to go next: Are you linking enough to other pages relevant to that topic? Often, I find that plug-ins that automatically pull related posts aren’t enough to get people to click. Try including links to relevant posts within your text (interlinking) or adding a call to action at the end where you suggest what similar post to read next (which can lead a reader to take action by visiting another blog post).
- Technical issues: Does the page have random code showing? Is an image broken? Is something else not rendering properly? If a page looks awkward, a visitor may leave your site.
Finding opportunities to highlight key content
You want visitors to notice your best content. Looking at your most viewed content in Google Analytics can help you undercover ways to bring that content to a new audience. To see the most viewed content on your blog, follow these instructions:
- Visit your Google Analytics dashboard (https://www.google.com/analytics/web) and log in.If you have more than one blog, select the blog you want to look at.
- From the left-side menu, choose Content➪Overview.
This brings up data on all individual blog posts and pages, sorted by highest number of page views. - On the bottom right of the screen, select View Full Report.
After you’re able to dig in and see what content is the most and least popular, you might find that you can do the following in your blog design:
- Highlight new visitor opportunities. If certain pages get a high percentage of new visitors, make sure those visitors come back. You could create a custom welcome message on these pages that directs them to a Start Here page, to a newsletter subscription page, or to follow you on Twitter.
- Showcase great but overlooked content. As you look through this report, you may start to see that some of your great content isn’t getting as many page views as you’d like. If this content really shouldn’t be missed, you may decide to highlight it on your sidebar. You might also want to check that you properly categorized the post so readers can navigate to it more easily.
- Build new targeted pages. As you look through your top content, you may consider designing a new blog page that not only highlights a top post but also gives you an opportunity to showcase other similar posts.
Perhaps you ran a blog post series around a certain topic. You could create a page that highlights the entire series.
Or perhaps one of your top posts is part of a category that you want to highlight on your blog. You can create a page highlighting some posts from that category and add a link to see the rest of the posts in that category. You could even create a blog page like Reader Favorites or Best of the Year that highlight unrelated, yet popular, posts.
After you create a targeted page like one of these, you can build that page into your navigation menu design or add a graphic in your sidebar that directs people to the page.
Looking at referral traffic
Referral traffic is the traffic you receive that comes from sites other than search engines. You might receive traffic from social media sites like Facebook, Twitter, or StumbleUpon (www.stumbleupon.com). Or you might receive traffic from other blogs or websites that link to you.
By looking at the places where your traffic comes from (and doesn’t come from), you can make navigation design decisions that help meet your goals. To take a peek at your referral traffic, follow these steps:
- Visit your Google Analytics dashboard (analytics/web) and log in.If you have more than one blog, select the blog you want to look at.
- From the left-side menu, choose Traffic Sources. This brings up the top ten sites that bring traffic to you. At the bottom of the page, open the Show Rows drop-down menu and choose 50 to get a more complete picture.
- Go one level deeper by clicking the Performance button and choosing Bounces from the right column drop-down menu.Now you can more easily spot problem areas in your blog’s navigation design.
You can glean so much from this information! Here are some helpful things you can learn from your data:
- Top social media sites for referral traffic: For whichever sites bring you the most traffic, make sure you have those corresponding social media sharing buttons in a visible spot on your blog. (That is, the buttons that allow readers to share a blog post or page on a social media network.)
You may even decide to add a widget to your sidebar or footer that showcases your content on one of those platforms (like how a Facebook widget allows visitors to Like your page without having to go to your actual business page). - Areas to encourage navigation deeper into your site: If you click any of the referral sites, you can often glean even more information. For example, view the most popular posts that attracted Twitter users to your site. Or see which pins from Pinterest brought you the most traffic. Although not all the referral data is that helpful, you can use this information to determine whether you should add custom messages to posts or add more links to other relevant posts.
- Opportunities to grow your social media network: If certain pages attract a high percentage of new visitors, they likely came from someone else sharing a blog post of yours. If these visitors are new to your blog, they probably aren’t followers or fans . . . yet. You could add an additional message to these pages to capture them as new followers.
Deciding Who Designs Your Blog
If you're reading this post, you obviously have a little bit of the do-it-yourself spirit. When it comes to designing your blog, you may find that you can do lots of things yourself, like adding a plug-in to WordPress or a widget to Blogger. But when it comes to putting together a comprehensive blog design, do you want to take on a little, a lot, or nothing at all?Luckily, there’s more than one way to design your blog. In this section, I cover benefits and challenges for each option so you can make a choice that suits your needs.
Hiring a designer
If you don’t have the time or inclination to design a blog yourself, hire someone to do the work for you! Hiring a designer costs money, but you can often find a designer whose rates are within your budget and who fits your style.
Having a blog professionally designed can cost anywhere from a few hundred dollars to $5,000 or more. The range in cost is sort of like pricing a vacation. When you plan a vacation, your costs will depend on where you want to go, where you stay, and how much you want to do. Blog design can also range in price, depending on which blog platform you want, the designer’s experience, and how comprehensive of a design you want.
Hiring a designer or design firm to create your blog designs has both its benefits and challenges.
Benefits of working with a blog designer
When you work with a blog designer, you
- Get exactly what you want. When you work with a good designer, you don’t have to settle for blog design that’s limited because you don’t know how to do something technical. You get what you want without needing the knowledge to accomplish it.
- Exercise creative power. Good designers can translate your blog vision and your passions into a blog design that’s just for you. They can also help you weed out the blog elements you don’t really need or suggest creative ways to solve your design or layout challenges. For example, Catherine Horgan from Closet of Style loves layers. She loves to layer clothes and mood boards as well. After a design discovery meeting with designer Laurie Smithwick of LEAP Design, she ended up with a site that matches her passions.


- Receive support. A designer can also handle the really technical stuff, like making sure your blog looks the same in Internet Explorer as it does in Google Chrome. Plus, after your blog design is installed, a designer works with you to iron out any kinks or technical issues with your new design. If you need help troubleshooting or help with blog maintenance, many designers offer blog maintenance packages or charge by the hour.You always have someone to help you out of a bind.
Challenges of working with a blog designer
And here are the challenges:
- Cost: Yes, you have to fork over some dough to have someone design a custom blog for you. Although many designers offer special design packages, you may end up having to add on extra design elements to fit your needs.
- Dependence on designer: If you hire someone else to design your site, you won’t learn as much about how to use your blog as you would designing it yourself.
- Designer mismatch: Perhaps the designer’s style doesn’t match yours, or the designer just isn’t pleasant to work with. Depending on your contract, you may need to pay more creative fees for additional design options.
Purchasing a predesigned theme or template
If you don’t want to hire someone to design your blog but don’t quite want
to do it yourself either, a predesigned template might be the perfect middle
road because you don’t have to know a lot about the technical side of blog
design. Predesigned templates widely vary from great designs to not-so-great
ones. With the knowledge you can glean from this book, you can likely create
a blog design that you’re happy with.
Of course, purchasing a predesigned theme or template has both benefits and challenges.
Of course, purchasing a predesigned theme or template has both benefits and challenges.
When you opt for a predesigned theme or template, you benefit from the following:
- Fast set-up: With predesigned templates, you can get your new blog
design up and running faster than having someone else do it for you (or
doing it all yourself). The base design is already complete, ready for you
to customize it.
Customization capabilities: Just about every predesigned template
allows you to tweak design elements, such as color, layout, and fonts. In
image, the WordPress predesigned blog template from Templatic ( is for someone who wants to highlight an e-book and blog about their topic. To make changes to the design and content, you simply add images and make content changes within your theme. You can see that simply modifying this text will change the first feature box to your content.

- Inexpensive yet still professional look and feel: A predesigned theme or template still gives you a blog design that looks professional but at a lower cost (because it isn’t customized by someone just for you).
The downsides of a predesigned theme or template include the following:
- Not as unique: Although you can indeed customize a predesigned template to an extent, your blog design won’t be as unique as one that’s made by you or a designer. Ensure upfront that you can tweak the design enough so that your blog won’t look generic.
- Limitations in customization: Many templates do offer some flexibility in design, but you may be stuck with the general layout or the location of a certain design element. Some templates are more customizable than others, though, so check the features for the template before purchasing it.
Designing it yourself
If you have a passion for learning
new things and don’t mind experimenting,
try designing your blog
yourself.
Of course, your reasoning
could
be less adventurous — say,
you
might just not have the funds
right
now to pay someone else to
design
your blog. Regardless the
reason,
designing your own blog can
be
rewarding!When you get stuck, my best tip is to research your way to the answer. You’re definitely not the only one who’s ever designed their own blog. The Internet is full of tutorials, forums, and videos that can teach you how to do something. Between this book and the Internet, you could teach yourself many, many things about design. Bloggers who design their own blogs themselves typically work on blog frameworks like Genesis or add customization to predesigned templates that offer a lot of flexibility.
Benefits of designing your own blog
Here’s the good news if you go on your own:
- Lower cost: Creating your own blog design is budget friendly. You might spend some money on imagery, a special plug-in, or a theme to serve as the shell of your design, but those outlays are far less than what you’d pay to hire someone.
- New skills: Design programs, HTML, and CSS may be unfamiliar to you when you start, but as you work through your design, you learn new skills that allow you to make your own changes to your blog whenever you want. Blogger Laura Tremaine rolled up her sleeves to design her own blog, Hollywood Housewife.

- Fits your style: No one has a better sense of your tastes than you! You don’t have to worry about finding the perfect pre-made theme or working with a designer who can’t quite nail the look and feel you’re after.
Challenges of designing your own blog
On the other hand:
- Takes time to learn: Heading into unknown territory can be exciting, but you’ll undoubtedly spend many, many hours designing your own blog. Something that takes a professional designer two minutes to complete may take you longer if you have to learn how to do it.
- Lack of technical assistance: Certain coding mistakes can cause other areas of your sites to not work — or worse, can crash your blog. In addition, small tweaks to your site can be time consuming.
- May not get exactly what you want: You may have a cool idea for your design but not know how to create it. While searching online for a tutorial can often work, you may find certain ideas just go beyond your current abilities.


Post a Comment